


Great achievements are fueled by passion
This blog is about those who have purchased GPU+CPU and want to configure Nvidia Graphic card on Ubuntu 18.04 LTS and play with tensorflow-gpu. This blog will cover installing Nvidia drivers on ubuntu machine which will help you to install CUDA Toolkit 9.0, CUDNN 7.0. In the end of this tutorial, we will cover installing the virtual environment on Ubuntu and installing tensorflow-gpu on it using pip command. Everything will be divided into the steps. Every step will be explained with proper care and screenshots wherever it is possible. Please bear patience at each step. Nvidia does have any official downloads for ubuntu 18.04 but files available for 17.04 works for it. Please look below what is the content of this blog which we will be covering.
- Disabling Open Source Ubuntu NVIDIA drivers
- Install Nvidia Drivers
- Install CUDA Toolkit 9.0
- Install CUDNN 7.0
- Install libcupti
- Setting the path
- Installing the virtual environment
- Installing and verifying tensorflow-gpu
What you will achieve after this blog
- Tensorflow-gpu will be configured with ubuntu 18.04
- Nvidia graphic card will be installed for ubuntu
- You will learn how to create virtual environment
- Some superficial knowledge about CUDA will be delivered to you.
1. Disabling Open Source Ubuntu Nvidia drivers
Nouveau is the name of the program which has developed high quality, free software drivers for Nvidia graphic card by reverse engineering. It is written in C language under MIT Licence. It provides accelerated open source drivers for nvidia card. It is managed by X. org foundation. Out first step would be to disable free open source nvidia drivers using the below steps
- Step 1: Create the below file in your ubuntu machine
nano /etc/modprobe.d/blacklist-nouveau.conf
- Step 2: Please edit the file with the following content
blacklist nouveau
options nouveau modeset=0
- Step 3: Regenerate the kernel initramfs using the below command
sudo update-initramfs -u
- Step 4: If all the three steps has been done by you successfully and you donot face any errors, then simply reboot the system. Please enter the below command to reboot the system.
sudo reboot
- Step 5: When you reboot the system, we need to verify that nouveau drivers are loaded or not. Please enter the below command to verify it.
lsmod | grep nouveau
If nouveau drivers are still loaded, please don’t go to the next step and troubleshoot why it is still loading.
2. Install Nvidia Drivers
Once the first step is complete and before installing the CUDA Toolkit, you need to install Nvidia Drivers. Please use the below command to detect the model of the graphic card and the recommended drivers. To execute the above command, please execute the below command.
ubuntu-drivers devices
You will get the list of model of your graphic card and list of non-free drivers and which one is recommended. It will help us to install recommended drivers. For example if nvidia-410 is detected as recommended one, please install it using the below command
sudo apt install nvidia-410
3. Install CUDA Toolkit 9.0
Once you have completed the above step, please reboot the system and execute the below command.
nvidia-smi
If you will get the output representing your gpu model and version of driver which you have installed in the step 2, it means everything is going smooth else please look at the previous step and do troubleshooting. This step is about installing CUDA Toolkit. Please look at the below image to understand the relation between cpu and gpu
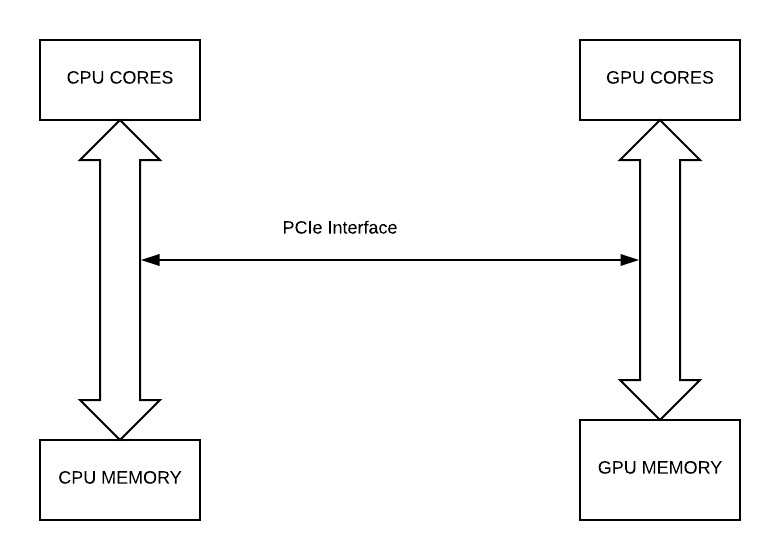
First of all CPU arrays are initialized. GPU memory is allocated for these arrays. Arrays are transferred from CPU to GPU which uses cores to process it. Here comes the use case of CUDA. Please note that CUDA is meant for only Nvidia. CUDA stands for Compute Unified Device Architecture. It is the programming language developed by Nvidia. Operation of the GPU are performed by CUDA cores. Performance of the CUDA cores depends on the Nvidia architecture of the GPU. Cuda cores performance will be different for RTX 2080 Ti, GTX 1080 Ti, Pascal, Maxwell. Once the manipulation is done by the GPU, results are transferred from GPU memory to CPU memory. At that time GPU memory is de-allocated.
To download the CUDA Toolkit 9.0, Please follow the below steps
- Please visit NVIDIA LINK for CUDA TOOLKIT.
-
- You will get the below screen if you click on this link.

Installing CUDA 9.0 Step 1 -
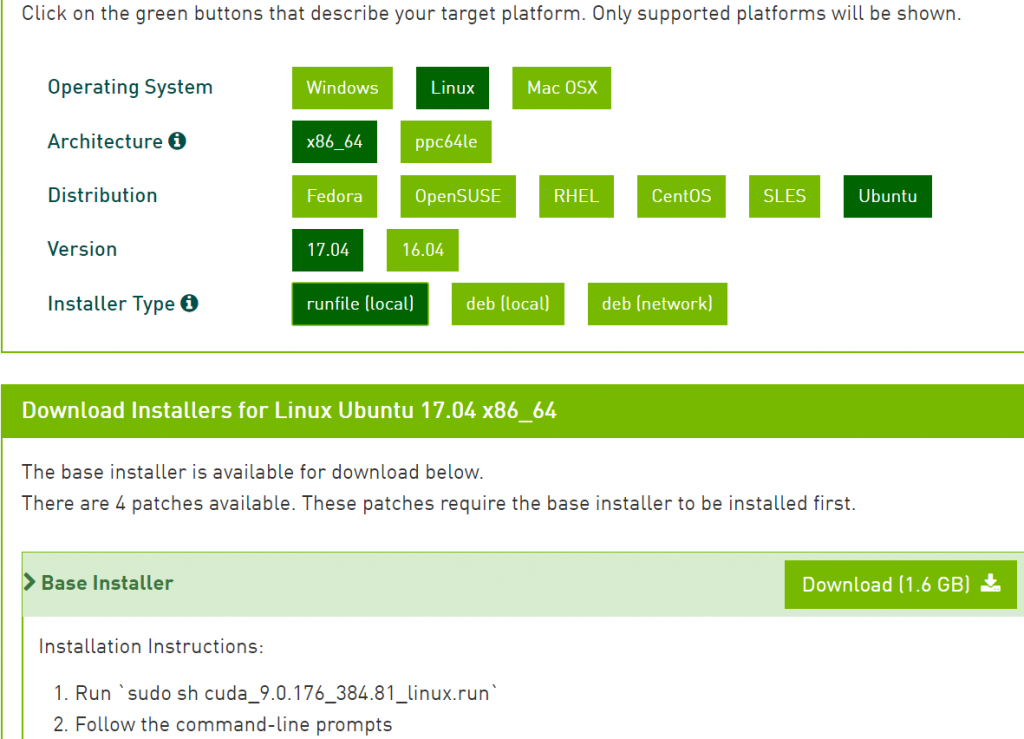
- Now you have to select the Operating System. Next step would be to select the architecture, then distribution, version and finally select installer type as runfile (local). To get visual understanding of this point, have a look at the below screenshot.
Installing CUDA Toolkit 9.0 Step 2 - Downloading file would be about 1.6 GB which will take time according to your internet connection so have patience till the file is being downloaded. If you want to utilize the time till the download is finished, you can watch one of my video of www.aisangam.com which is my parent company. I am sharing the link for it. Please have the linkhttps://www.youtube.com/watch?v=8aHbjIPAvZc&t=361s
- When you got the files, please navigate to the folder where the files are downloaded. Hopefully it would be downloads or any path that you have set. Open the terminal using ctrl + alt + t and type the below command
sudo chmod +x cuda_9.0.xxxxxxxxx.run
./cuda_9.0.xxxxxxxxx --override
xxxxxxxxx: means anything which is your version.
While installing, you have to accept terms and conditions. During such, please type yes when asked for installing with unsupported configuration and no to install Nvidia Accelerated Graphic drivers for linux-x89-64xxxx.
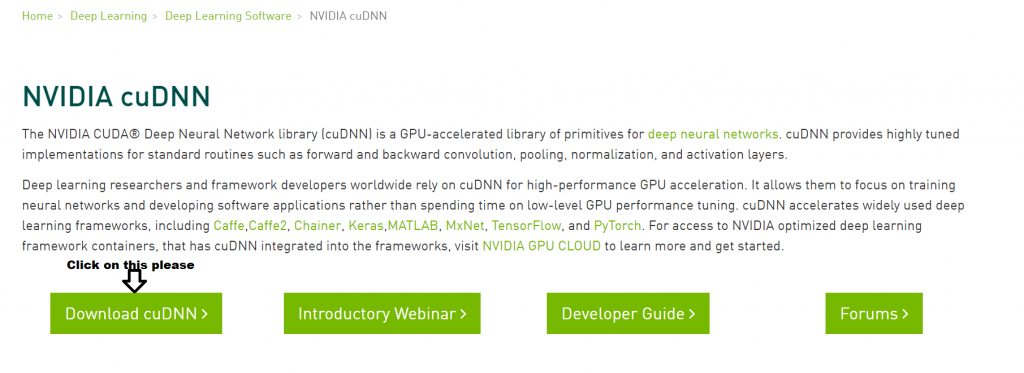
4. Install CUDNN 7.0
Once the previous step is installed, please install CUDNN 7.0. Let us proceed with this step.
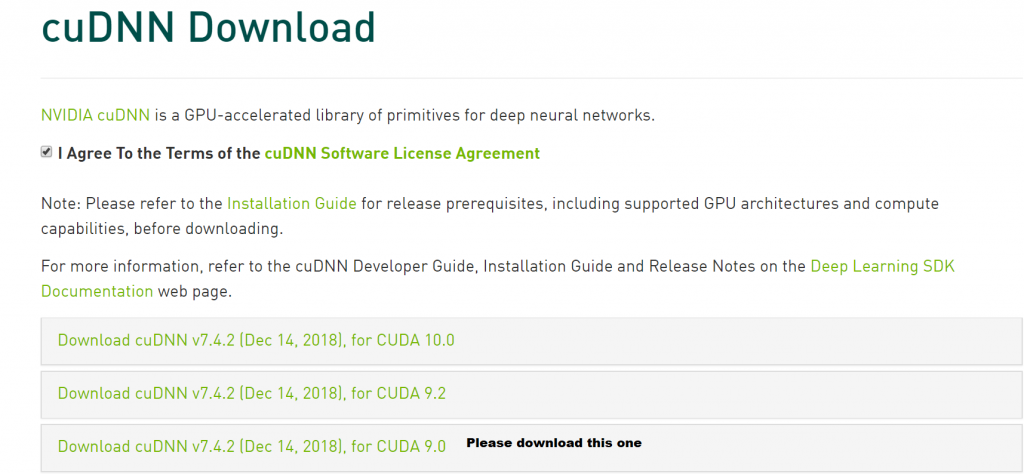
- Please visit the link to install CUDNN. You will get the following screen when you click on this link.
Installing CUDNN - You will be taken to the next page where membership is required. Please create account here. If you don’t have you can create a new one else login with the account you have. If you face any problem, please see the screenshot as some person understand better with the help of visual and images.

Membership Page - When you login with the credentials you will be subjected to the next page where you have to accept the terms and conditions. Once you tick it, you can download CUDNN. Have a look at the below screenshot if you face any problem.
Installing file for CUDNN - Once the file is downloaded, file is extracted. Downloading time will only depend on internet speed. If it is taking some time to download it, you don’t worry. I have some videos for you which will consume your time in an effective way. Please have a look at videos made by our parent company www.aisangam.com.
- Next step is to extract the file. Please point to the folder where the file is downloaded and type the following command.
tar -zxvf cudnn-9.0-linux-x64-xxx
xxx: Represents the version which you have downloaded.
- Move the content of the extracted folder to the following location. Please note if you have set any customize location for installing cuda 9.0 while installing it.
sudo cp -P cuda/lib64/libcudnn* /usr/local/cuda-9.0/lib64/
sudo cp  cuda/include/cudnn.h /usr/local/cuda-9.0/include/
- Give read access to all the user using the below command
sudo chmod a+r /usr/local/cuda-9.0/include/cudnn.h /usr/local/cuda/lib64/libcudnn*
5. Install libcupti
This is the next step. If all the above steps are successful, please proceed with this step using the below command.
sudo apt-get install libcupti-dev
6. Setting the path
I hope that all the previous steps has been configured by you. Now it is important to set the path. Please open the file ~/.bashrc with your favorite editor. My favorite one is nano. You may also use vim or sublime or gedit. Please type the below at the end of the file.
export PATH=/usr/local/cuda-9.0/bin${PATH:+:${PATH}}
export LD_LIBRARY_PATH=/usr/local/cuda/lib64:${LD_LIBRARY_PATH:+:${LD_LIBRARY_PATH}}
7. Installing the virtual environment
Once you have done with all the above steps, it is important to check whether we have successful configured we need to install tensorflow gpu. We can create the virtual environment and can install tensorflow using pip statement. Please follow the below commands to install the virtual environment in ubuntu for python
sudo apt install -y python3-venv
Please type the below command to install virtual environment
python3.3 -m venv ai_sangam
Installing and verifying tensorflow-gpu
This is the last step. We are near to aim which is installing tensorflow GPU to use Nvidia Graphic card. Once the virtual environment is installed, please activate it using the below command.
source ai_sangam/bin/activate
Now please execute the below command to install tensrorflow-gpu.
pip3 install --upgrade tensorflow-gpu
You can check whether gpu tensorflow is properly configured by typing python3. Once you type python3 in the terminal (virtual environment is activated) python3 will be launched. Please type the below command
import tensorflow
If no error came, it means that tensorflow gpu is properly configured. As the part of this tutorial we have learned how to configure tensorflow GPU using Nvidia graphic card on Ubuntu machine. We have promised that after reading this blog you will get some understanding about the following.
- Tensorflow-gpu will be configured with ubuntu 18.04
- Nvidia graphic card will be installed for ubuntu
- You will learn how to create virtual environment
- Some superficial knowledge about CUDA will be delivered to you.
I hope all the points are being covered in this part. In a nutshell, we can also conclude that configuring GPU is not as difficult as it seems. We need to follow proper steps. You can also watch some of our trending videos from the below link
Real time face recognition on custom images using Tensorflow Deep learning
Object detection Custom Training of Image Mask CNN Deep Learning | AI Sangam
Auto music tagging prediction using Deep learning
Tensorflow Image classification using Inception-v3 deep learning
Along with the above readers can also read about The Best Gaming Graphic Card for PC/Laptop from this link


Hello Self Awareness hub,
Hope you are find and enjoying good health. There is question from my side. My question follows as how to get the knowledge which of the cuda and cudnn fits for which version of tensorflow-gpu. I hope that you got my question.
If you need any more clarification to my question, please let me know.
With regards
foundationideas
First of all thanks to foundationideas for reaching to us. It is our pleasure to respond you back here
With respect to your question stated “how to get the knowledge which of the cuda and cudnn fits for which version of tensorflow-gpu.” answer follows as below
First of all please check cuda and cuDNN version respectively using the below command
Please see the below tensorflow-gpu version====> cuDNN version ======>CUDA
Name of tensorflow-gpu version cuDNN Version CUDA Version
tensorflow_gpu-1.12.0 =======> 7=======> 9
tensorflow_gpu-1.4.0=========> 6=======> 8
Sir it is great to hear such a response from you. This has made my day but in the code that you have attached here, i did not understand what is the meaning of cat command. Can you elaborate this command also.
With regards
foundationideas
Okay, Please see the description as below
Cat functions in Linux
1.) Display contents of file.
2.) View Contents of Multiple Files in terminal
3.) Create a new file using cat >test2
Hello Self awareness hub!!
How are you. I hope you are fine. All of your articles are very impressive and I loved to be here. Some of the features that I loved for this article are as below:-
1.) Content is impressive and invoking.
2.) Screenshots helped me a lot.
I too have configured GPU ubuntu but while i was running the model, I was struct in the following error.
terminate called after throwing an instance of ‘std::bad_alloc’
what(): std::bad_alloc
Aborted (core dumped)
Can you help me out
With regards
Vishal Kumar
First of all Kumar self awareness hub welcomes you for reaching us. It is pleasure to hear that you have configured your GPU. Great work kumar.
As I can see the error, it reveals that your memory of GPU is exhausted. So if you are creating the model using tensorflow, you must clear the graphs between the tensorflow training using the below command
If you are using keras, please execute the below command
May be these helps you in clearing the memory
With regards
http://selfawarenesshub.org
Thanks a lot
With Regards
Vishal Kumar
Hello Self Awareness hub!!
I congratulate you for writing such an flamboyant article. I loved to read the article again and again. One of the reason I loved about this article is steps are elaborated as screenshots are added so as to make the things simple for the readers. This article is earmarked by me. I have successfully configured my GPU with Ubuntu. My aim is to see the GPU usage both of processor as well as memory. Please suggest me the way to do so.
With Regards
Alex
First of all, I would thank you for reaching to us. To measure the GPU Usage, you can use glances which is a monitoring program. Please run the below command to install it
After the successful installation please run the below command
sudo glances
Moreover, please visit the following link to find different ways to monitor the gpu processor and memory usage.
https://askubuntu.com/questions/387594/how-to-measure-gpu-usage
With regards
http://selfawarenesshub.org
Hello Guys, It is great to comment here. I have gone through all other comments and found them very useful to me especially which version of cuda is linked with which version of tensorflow.
I got the problem as below while I was running the code with tensorflow-gpu.
Loaded runtime CuDNN library: 7.0.5 but source was compiled with: 7.2.1.
Please help me out.
With regards
Rahul
Hello Rahul. Hope you are okay.From my point, first of all check the version of tensorflow-gpu you are using using the below command
Please upgrade the version to 1.9.0 using the below command and uninstalling the previous installation
If you need more help in learning about the basics of tensorflow please do visit the following links
https://www.aisangam.com/blog/category/tutorials/tensorflow-tutorials/
With regards
http://selfawarenesshub.org/
I would like to ask you that while running the model using tensorflow-gpu , I got the following error
cuda memory error or exhausted memory:
My gpu supports 11 GB VRAM. Could you explain how to resolve this error
Hello sonam. Hope you are fine and in good health. Donot worry about the problem.
First of all see which of the processes are using your GPU memory by executing the following command in terminal
Now note the PID number of such command and type sudo kill -9 PID Number. Please run the code again. Problem is resolved.
Hello sir, comments are really useful to me and helped me a lot. There is a question from my side and I hope you will help me to resolve it.
My question follows how one can know which of the nvidia drivers are best for my system. Please do comment on this.
Thanks for such question. Actually it is important to note which of the nvidia drivers are recommended for the system so that best drivers could be installed.
Please follow the below code to know it. Paste this command in the terminal
Hello, I read the blog and found the blog very useful especially for those who want to configure GPU for the first time. I have also configured it and installed pytorch. I want to test whether it is using cuda and gpu. I would be grateful to you.
Thanks for asking the question. Please run the below command to verify it.